
Beam#
The Beam class in the mento package is designed to model and analyze rectangular reinforced concrete beams. It allows users to define the geometry, material properties, reinforcement and custom settings.
Key Concepts#
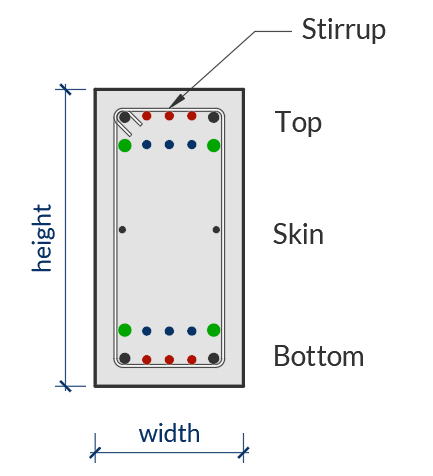
Beam Geometry: Defined by width and height.
Material Properties: Requires a Concrete object (e.g., Concrete_ACI_318_19) and a SteelBar object for reinforcement.
Reinforcement: Longitudinal and transverse reinforcement can be defined using set_longitudinal_rebar_bot, set_longitudinal_rebar_top, and set_transverse_rebar.
Custom settings: A Beam object can have custom settings overriding the default settings of `mento.
Usage#
Below is a step-by-step guide on how to use the Beam class in your structural analysis workflows.
1. Creating a Beam Object#
To define a beam, you need to specify its geometry, material properties, and clear cover. The RectangularBeam class is used for this purpose. If no custom settings are passed to the Beam object, it will take the default values.
from mento import Concrete_ACI_318_19, SteelBar, RectangularBeam, mm, cm, kN, MPa

# Define materials
concrete = Concrete_ACI_318_19(name="C25", f_c=25*MPa)
steel = SteelBar(name="ADN 420", f_y=420*MPa)

# Define beam geometry
beam = RectangularBeam(label="101", concrete=concrete, steel_bar=steel, width=20*cm, height=50*cm, c_c = 2.5*cm)
2. Setting Reinforcement#
You can define the longitudinal and transverse reinforcement for the beam using the following methods:
Bottom Longitudinal Reinforcement: Use set_longitudinal_rebar_bot.
Top Longitudinal Reinforcement: Use set_longitudinal_rebar_top.
Transverse Reinforcement (Stirrups): Use set_transverse_rebar.
Note
Consider that:
If no transverse reinforcement is defined, it is assumed that plain concrete will resist shear forces.
If no longitudinal reinforcement is defined, a minimum of 2Ø8 will be considered for metric system or 2#3 for imperial system of units. Mento won’t check a beam without longitudinal rebar.
Skin rebar is not considered for the check or design of the beam.
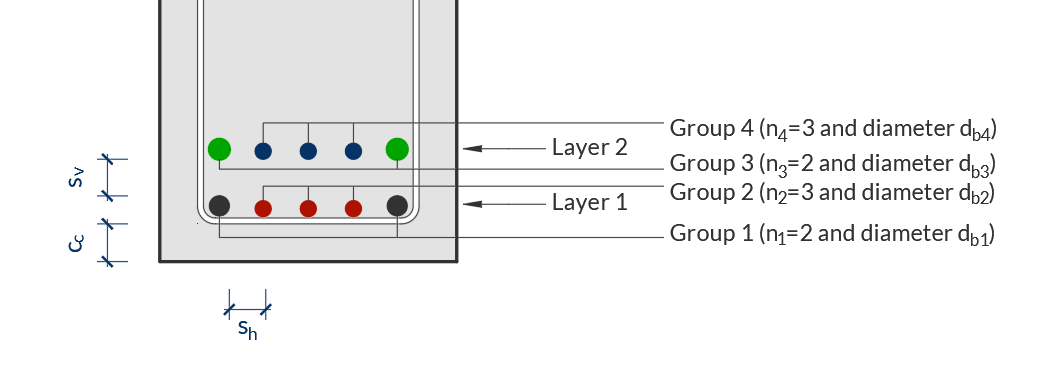
Transverse reinforcement This is set indicating amount of stirrups, the diameter of the stirrups and the spacing of the stirrups along the beam.
Longitudinal reinforcement This is set indicating rebar for two layers, differentiating between border bars and inner bars. Each group of bars, for each layer has a unique number id. Bars can be defined both for top and bottom of the beam, which will be considered for negative and positive bending moments respectively.
In case a flexure analysis requires compression reinforcement additional to the tension reinforcement, the opposite reinforcement will be considered. For example, if a positive moment is so large that the section must be reinforced at top&bottom, the top rebar will also be considered in the beam capacity for flexure.
# Set bottom longitudinal reinforcement
beam.set_longitudinal_rebar_bot(n1=2, d_b1=16*mm, n2=1, d_b2=12*mm)

# Set top longitudinal reinforcement
beam.set_longitudinal_rebar_top(n1=2, d_b1=16*mm)

# Set transverse reinforcement (stirrups)
beam.set_transverse_rebar(n_stirrups=1, d_b=10*mm, s_l=20*cm)
3. Assigning Forces to the Beam#
Forces are applied to the beam through a Node object, which joins the Beam and Forces object together. See the Node section for more information on how to create a Node and assign forces to the section.
4. Performing Checks#
Once the beam is defined and forces are assigned in a Node object, you can perform checks for shear and flexure. See the Node section for more information on how to create a Node and check the section.
5. Design the section#
If you don’t assign transverse or longitudinal rebar, you can ask Mento to design for shear and flexure. See the Node section for more information on how to create a Node and design the section.
6. Jupyter Notebook Results#
After performing the checks, you can view the results in a formatted way in a Notebook.
When you run node.results, the output includes:
Top and bottom longitudinal reinforcement.
Shear reinforcement.
Applied moments and shear forces.
Design capacity ratios (DCR).
Warnings (if any).
The output is formatted using LaTeX math notation for clarity and precision.
Example Output#
Here’s an example of the output from beam.results:
Interpreting the Output#
Geometry and Materials
The first line provides the beam’s geometry and material properties:
Beam 101: Beam identifier.
\(b = 20.00 \, \textsf{cm}\): Beam width.
\(h = 60.00 \, \textsf{cm}\): Beam height.
\(c_{\text{c}} = 2.50 \, \textsf{cm}\): Concrete clear cover.
Concrete C25: Concrete grade.
Rebar ADN 420: Rebar grade.
Longitudinal Reinforcement
Top longitudinal rebar: Reinforcement at the top of the beam.
\(2\phi16`\): 2 bars of 16 mm diameter.
\(A_{s,\text{top}} = 4.02 \, \textsf{cm}^2\): Area of top reinforcement.
\(M_u = -80 \, \textsf{kNm}\): Applied moment at the top.
\(\phi M_n = 81.65 \, \textsf{kNm}\): Design moment capacity at the top.
\(\textsf{DCR} = 0.98\): Design capacity ratio \(\textsf{DCR} = M_u / \phi M_n\).
Bottom longitudinal rebar: Reinforcement at the bottom of the beam.
\(2\phi16 + 1\phi12 ++ 2\phi12 + 1\phi10\): Combination of bars.
\(A_{s,\text{bot}} = 8.2 \, \textsf{cm}^2\): Area of bottom reinforcement.
\(M_u = 90 \, \textsf{kNm}\): Applied moment at the bottom.
\(\phi M_n = 154.95 \, \textsf{kNm}\): Design moment capacity at the bottom.
\(\textsf{DCR} = 0.58\): Design capacity ratio \(\textsf{DCR} = M_u / \phi M_n\).
Shear Reinforcement
Shear reinforcing: Shear reinforcement details.
\(1s\phi10/20 \, \textsf{cm}\): 10 mm diameter stirrups spaced at 20 cm.
\(A_v = 7.85 \, \textsf{cm}^2/\textsf{m}\): Area of shear reinforcement per meter.
\(V_u = 80 \, \textsf{kN}\): Applied shear force.
\(\phi V_n = 196.24 \, \textsf{kN}\): Design shear capacity.
\(\textsf{DCR} = 0.41\): Design capacity ratio \(\textsf{DCR} = V_u / \phi V_n\).
Check DCR Values: A DCR less than 1.0 indicates that the beam is safe under the applied loads.
Review Warnings: If the output includes warnings, review the design to ensure compliance with code requirements. You can check detailed results for more information.
7. Detailed Results#
See the Node section for more information on how to display and save detailed results of the analysis.
8. Plot section#
You can use the method plot() to visualize the beam’s cross-section and reinforcement layout.
# Plot the beam section
beam.plot()
The plot() method generates a graphical representation of the beam, including its geometry and reinforcement details. This can be useful for verifying the input data and for presentation purposes.